Wednesday, November 25, 2015

Weather Booklets

For the past three years, myself and the 2nd grade have collaborated on a project about weather. I personally love collaborating with my classroom teachers and joining forces to help the students learn. And with the weather it is a great chance to discuss landscape and how to create them with details.

In the past I have done a pop-up card and an abstract work of art. Both, I feel were not the best to display the students learning. THIS YEAR THOUGH. Oh snap.

 I luckily enough had these dense cardboard pieces saved for me over the summer. With the help of prep time, an electric three-hole punch, and just having enough time in class. My students created these awesome little stand up booklets (I choose booklets because it is one page).
Like many projects I do, we sketch! I discussed the horizon line and size changes with them but also what details might help tell the viewer what weather it is. This is one part I wish we had more time on but I wanted to get it done quick. Why? You'll find out.  


After just a class of sketching, we created the final cover and a facts writing sheet. The writing, I even demonstrate in my example video, that spelling is not important to me BUT important to their classroom teacher. I mainly cared about the cover. Due to the size of the booklets, the cover paper had to be a bit smaller. 


Next class was putting it all together. This is where the electric hole punch came in. I have about 60 students between my two 2nd grade groups, each needed two. THEN hole punching those writing sheets. I made a set of 5 holes and told them to make a sandwich of their board, facts sheet, and board. Luckily a good number of my students know how to tie knots. I told them to triple tie each one and then glue on their cover. 

End result, a little booklet that stands on its own. 

AND they needed to be done quickly because there is an event at my school called Grand
friends day before Thanksgiving. So we wanted to have the kiddos share them with their grand friends.


Monday, November 23, 2015

Kindergarten Rainbow Trees

OH LOOK A RAINBOW!

I personally hate doing the same boring rainbow. So I decided to switch it up a few years a back with the rainbow tree!
How I start it out is, I read the students "Stuck" by Oliver Jeffers. A personal favorite author, good stuff.  I talk about the details they notice and how the colors of the tree are different and what they think might happen. 

After that, we start the tree first. I simply have them put their hand in the middle of their paper, like it is stuck, and trace it with their arm. Next they color it in with brown and wahal! a tree without leaves. 


From here is the painting fun! I start with a primary and mix in another primary to make a secondary. I do two colors a day due to my time with them. As you can see, I use a paper plate for the paint and I give them a small sponge to stamp the leaves with. I go over every time the expectations of cleaning up after themselves and how to do it quickly so our other friends can get cleaned up too. 

As we go through the colors, I make them count. First 10, then 15, and finally 20. I also discuss layering and not painting with it but stamping. 
 

Once all painting is done, we add details that we would find outside. Really pushing them to color in as much as they can. 


Handy Tips


So I know my watercolor paints go quick. My students love to use them and there can be colors that don't get used as much. What I started doing is this.

Depending on the brand, I either remove the color or cut it out of the rest and put in this box. The students have gotten a good hang of looking through it for some colors they might need. Or some even just go right to this just for a small amount they just want. Pretty handy.

Another clean up trick I use is this. 


NOT super fancy but effective. I started this last year with 2nd grade because they kept leaving behind paint. It is good to talk to the students about how to spread out the paper and when to recycle it. (We recycle as much as we can!) Trick is having a nice supply of newspaper. I normally just do a call out at the beginning of the year for some and BAM! newspaper. 

Tuesday, November 17, 2015

Bad Case of Stripes Self Portraits

I like to use book with my projects. Being at the elementary level really does help fulfill that. So with my younger students I try to go from book to artists to book with my project pattern. Sometimes even having a book about an artist.
For this project, I wanted to get them talking about patterns and being themselves. So I found Bad Case of Stripes and even a video on youtube of it being read. I play it for the students and discuss what it is about and the importance of you! 

Because stripes are discussed in the title, I also use it to discuss patterns. What makes a pattern? What has to happen? We compare patterns to non patterns and then design our own. Students have fun coming up with all these different ones. 

Next, the portrait time! I ask students "what is a self-portrait? Just from the name?"
This gets the ball rolling and I have them look at an example and discuss shapes they could use.
From here we practice practice practice! Being their first ones ( I don't do ones in kindergarten due to time.) 
EVEN breaking out the white boards to do practice on to really get those shapes we want. (Got them for $1 each at my local dollar store during back to school time. Best idea ever.)

Once my students just practice themselves, we combine the two. Self portrait and patterns! In another practice! (I am diabolical with using those sketchbooks.) 
I have them draw themselves three more times and then do a pattern background for each. If you are keeping track that is at least 6 drawings of themselves. 


FINALLY we start the final. 

Putting all this hard work and really showing we can say no to scribbles. 


Monday, November 16, 2015

BOATS!! Homer/Hopper Seascapes


Boats!! For this project I have the students look at the artwork of Winslow Homer and Edward Hopper. WHY? You might ask, well two reasons. One being my district has a benchmark where the students need to develop understanding for painting and landscapes AND opaque/transparent paints. This project combines all that and two being they are discussing artwork. I have them compare these two artists who have similar subject matters but have different feelings to their work. 

In comes the discussion of color choice as well. I use this project to also discuss tint, tone, and shade and how to create it AND discuss opaque and transparent paint. 
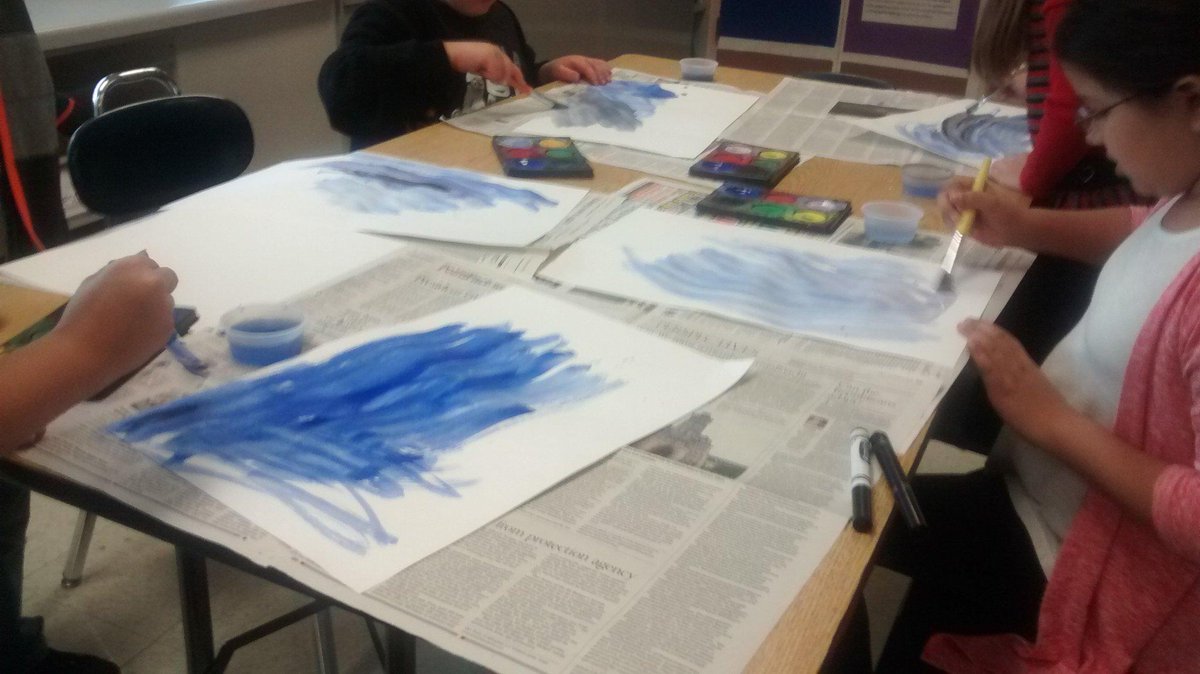
To create this high sea adventure I start by having the students paint one sheet of paper with watercolor tempera paint or as I called it our "opaque". THEN paint with regular tempera paint on a second sheet. 
Embedded image permalink
(Note that I have them work on newspaper to save on clean up.)

This can be a lot of fun but super messy. I allow them to experiment with the tint,tone, and shade by mixing right on the paper and allowing them to take paint for the regular tempera. 

Once dry, I put them together in their opaque and transparent partners and demonstrate how to make the water with the opaque paper as their sea. 


It is simple really, they take the opaque paper and rip it. I explain and demonstrate that if they rip it from short side to short, they can get these white edges. They then can layer it to create the sea as wild or calm as they want. THEN I show them how to make boats out of origami paper. I show them a picture of some boats and ask them about the size change. They then proceed to create their boats and I say a goal is to have 3 and in size order. 


I enjoy this project a lot because it gets them discussing many different elements of art. 


Wednesday, November 11, 2015

5th Grade Artist Inspired Self Portraits

For this lesson, I have students look at the artwork of more modern, even still working artists. The goal being they notice the style and recreate elements of it in their own self-portraits. This is the project I decided to do some flipping to it. 

I used four artists this year, Kehinde Wiley, Roy Lichtenstein, Elizabeth Peyton, and Tamara Madden. 

Before I even get to the artists, I have them sketch and practice drawing their self portraits and use proportions to guide them to get more realistic in there design. I even take pictures of them so they can draw on it to figure out their lines. 

Once some practices are created, unlike previous years, I introduced the artists quickly and guided them through online resources I provided. 


I am lucky to be at a school that has chrome books. Now, sadly my students could not access youtube so my technology interrogator and I came up with a plan. 
We used screencast-matic. This program that allows you to record the actions on your screen and record voice. It was very easy to use and I HIGHLY recommend for it is not that expenses either. So I made demo videos of how to use the artists style in their own artwork and posted it through this program.  This provided provides a website I could send my students too and they could decide for themselves and best of all SAVE TIME! Before this project took two extra weeks because they got confused due to me presenting all artists and not sure who was what. They could use the chrome books to re-watch steps.

I personal feel they learned better and made a strong connection AND turned out better too. 


Friday, November 6, 2015

Day of the Dead skulls

It is that time of year again! I don't do many holiday projects but the ones I do are more culture based and Dia de los Muertos or as known as Day of the Dead. 

I do little clay skulls with two grades, 3rd and 5th. My 3rd graders do little flat pendents and my 5th do more pinch pot skulls. 

3rd Grade Skull Pendents

The process of how they make the pendents is fairly easy. They start with creating a ball with the clay. Next they smoosh it flat, not too flat mind you, to get the skull shape. 
To make the jaw line, I have them pinch about at 3rd of the away down on the circle. This is where how thin or thick it is plays because if nice and thick, they can lift it up to pinch. 
Next, I have them use pointer and middle finger to poke out the eyes and pinky to poke the nose. I really focus on using their hands. 
THEN they can add details like the mouth or other design qualities with a stylist stick I call, a pokey stick. 
LAST we make a hole near the top for the pendent action to take place. 

In past years, I have let the skulls dry for two weeks and still ended up with blow ups in my kiln. THIS year, I tried a segmented firing of my kiln. A technique I learned over the summer. It pretty much is my own programming of my kiln to heat up at special rates.
End result...NO BLOW UPS! I was so thrilled. It took much longer but worth it. 


With no blow ups means more painting! I have both grades paint theirs with watercolor paints. Before they paint we discuss the designs of the skulls and details used. 

NOW I have a school with LOTS of bulletin boards but no real display cases. We have one that has one shelve. Got to get creative with displaying these bad boys. 


With 3D work at my school, we are sadly lacking display cases. The one we do have is small and has only one shelf. So got a little creative and used these boards I have to make a stand-up display in the library for the pendents and well the 5th grade skulls are not hard to put up. Remember the library is a great space to display. 


Split Emotion Self-portrait

2nd grade finished their self-portraits and overall great work. 


To start this project, I read my students the book. The Way I Feel. I ask them questions about what they think each emotion is based on the colors, the appearance of the person and colors used. I mainly point out 5 emotions; happy, sad, angry, silly, and scared. Common emotions I think we all can relate too. I also have them explain what shapes they feel work best for parts of the body and for the face before they start drawing.


I have them sketch out all these emotions with background and features of the face that show that emotion. REALLY point out that they can not just write "happy" on there. Have to see it to believe it, not read it. 


Once sketched, we create the final. Now this is were it can get tricky. I have them do two in one. I first have them fold the paper hot dog style( long side to long side) next they unfold the paper and draw the basic parts of them. Head shape, shoulders, and nose. The rest they add depending on the emotion. I tell them their goal is to have the viewer know the emotion on each side just by looking. 
I really push for craftsmanship understanding at this stage too. 


Finished product.