Wednesday, April 20, 2016

Ringgold Community Collage

A big focus for my 2nd graders is community. They study it all year round and I used this to inspire me to do a community project. And who better to base that project on then Faith Ringgold?

So started by reading them Tar Beach. One of her books about where she lived and what was around her community. (can you feel the connections?) Next we looked at starting our background because we learned that Ringgold starts with doing her background first. 


So I took this as a way to talk about science and how the moon reflects light in the night sky. We had a great discussion about why this happens and what colors we see in the night sky. To recreate this appearance. We explored tint and tone in a sky painting of the full moon. The students had a lot of fun seeing the transition of colors with just a little black. 


Another part we did was we planned what to include in our community. They got out their sketchbooks and drew and discussed. But part of this day was also creating our own scratch art paper to use for the boarder later on. We used oil pastel on heavy paper then covered with black acrylic  paint. (I normally use tempera with my students and a few actually noticed this paint was different.)


They had a hoot with it when I told them "just cover that paper with oil pastel. Does not matter color or design, just COVER!"


So the fun part that I am changing for next year. The community part collage part. I don't know if I over reached or the students didn't quiet get it but my goal was to have them create 8 buildings with overlapping with scrap paper. Now, the mistake falls in the overlapping of the buildings and number. I would say about 50% of them got the overlapping while others had buildings flying in the sky. So learned to either go over more or less buildings and just do a front simple few. 

BUT the collage board part was fun. We used wall paper, fabric and then those pieces of scratch art paper to create the border. I think for next year I will just make smaller pieces of the wall paper and fabric because a few fell off. Also good glue is really important here. 


Overall I feel this was still a successful project that I learned from to improve on next year. Their classroom teacher loved it so that is good for me. 

Monday, April 18, 2016

Recycled Bottle Banks

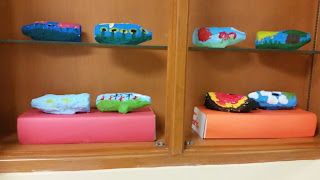
Integration is such a part of my art teaching that the classroom teachers share what is going on in their room on a regular bases. So one day my 3rd grade teacher asked if I had any idea on how to do a project based on their inquiry into renewable energy and recycling. Some time and planning later and a few eye twitches later. I came up with these Recycled Bottle Banks. Which I feel, honestly is pretty genius. 


So it starts with having the students pick a bottle. Now because bottles are cylanders that like to roll on their side, I have students attached old marker caps to the bottom as feet to hold the bottle in place. Just simple masking tape will do.
After that we paper mache', first in newspaper or old phone book paper. Then a layer in white to really finish it off. 
When they were all dry I cut the hole for the money myself with a box cutter. 


Next we paint! Now painting it was interesting because I had the students use their renewable energy source as their inspiration to paint. I had them design and describe to me what they planned to do before painting and I demonstrated to them the importance of a base color before details. The rest is all them.


I loved this project and so did my students. I had them make sure to paint the whole thing and they learned about the round. If I were to do this again, which I totally would. I would have more guided questions for my students. I feel like I told them why they needed the feet and why a base color is good. I want them to answer rather then be told why. 

NAEA National Convention! 2016


So NAEA convention was about a month ago already. And boy howdy was it amazing. 


First off demo spots from most of the MAJOR vendors. Sadly due to time and space, I didn't get to try much.


I did go with one of my fellow art teacher friends. Met this handsome gentleman. Learned about a lot of products. 


The convention was held in Chicago this year(hence why I was able to go) and was right a long the lake!


I attend some fantastic sections on a wide range of topics. Such as Literacy inclusion and STEAM. 


Like ugly dolls (we won a ducky)

And Ipads and animation!

But best part, was ofcourse. THE SWAG! 

I learned a lot from this trip and look forward to taking it to my classroom. I mainly focused on STEAM and integration sections because that is a personal passion of mine. 

Wednesday, April 13, 2016

New posters!

Being the art room, there are always posters around. I counted up one time how many I have made and it was well over 10. Two of these ones I created to help with some goals in my room. 
This one is an interesting one. I created it due to my school being an inquiry focused like enviroment for the students. A lot of the classrooms have these wonder spots and opportunities to research what they wonder about. So I created this. As you can see it has my k-5th and I created little pockets using extra lamination film. This picture is just from the first week. My 2nd and 1st really took to it. Which makes sense due to them being more familiar with the inquiry process. 


These two are pretty straight forward on what they do and why they were made. 

This one has to do with my PPG (professional planning goal) I decided to focus on rubrics and having my students understand more of the grading process in art. So I debated and research for awhile on a visual way to show the grading scale. Finally, I decided on this. It has been up for about a month now. I have not introduced it. Just had it up one day and students are referencing it. And they are beginning to understand what a 4 really means. 

Tuesday, April 12, 2016

Chinese New Year Dragons.


Yay for Chinese New Year dragons! I have lots of favorite projects but anything with clay is my jam. I enjoy this one because of the culture reference I can make to my students and having them learn about other parts of the world. I start by reading them the book "My first Chinese New Year" a nice little book that goes over some key factors of the holiday. Then I show them pictures of Asian inspired dragons compared to European inspired dragons. We compare and discuss what we see. Then we build!


To start, I give my students slabs of clay. Then they roll them up into coils or as they described them noodles, snakes, or worms. I have them lay their coil over a paper tube, sometimes with paper towel between. It makes putting away actually easier.  Next they pinch along the spine to make spikes for the dragons back. Then they break off a piece from the end and I show them out to slip and score. Yes, I show 1st how to slip and score. I show them how to make small coils and attach them to their dragon. 


The head is another piece they can just push in with their fingers and use a pokie stick to design or add on with slip and scoring. I tell them that if they don't slip and score, pieces fall off and their dragon is broken. But if it happens, just the way clay life is. 


After drying and kiln firing, we paint! I use watercolor paints and I show them more pictures of Asian inspired dragons to get the idea of colors. 


Monday, April 11, 2016

Wayne Thiebaud Cupcakes

Who doesn't like cupcakes?


For this tasty project, my 1st graders were inspired by the artist Wayne Thiebaud. In the past I have messed around with all different ways to do artwork based on him and this was my favorite so far. 

To start I have the students look at the artwork of Thiebaud and watch a little video about him. I have them discuss in a turn and talk about what they see in his artwork and what might be some good shapes to use to redraw what he did. Next we sketch and practice using oil pastels. I don't introduce supplies like oil pastels until 1st so it is a fresh experience. And I don't tell them what makes oil pastels so interesting to color with because I want them to discover it themselves. I even have them practice different ways to draw the cupcake. My requirements are that the cupcake cup have a pattern and that they say no to those scribbles. 

After some practice and we start the final. I have them use a sheet of 9 x 12  white paper to draw out their LARGE cupcake. I use my hand as a measure point for how big it should be. They then cut it out of the white paper and glue it down to colored paper of their choice. Some even decide to add little plates ( they figure out on own) or shadows. The shadows are thanks to our study into Cezanne awhile ago. 


Out of all the Thiebaud projects I have done, this has been my favorite. Not only allowing more creative ideas for how to draw it but the students really enjoyed how they came up with the steps. Plus who doesn't want to learn how to draw a cupcake. 


Pixel Art

Pixels! No not the movie, but the little dots that make up every image we show any student. Big or small they make it up. I wanted to do a more imaginative and self guided lesson with my 4th graders so I decided to do some pixel fun. Plus throw in some math and we had a good time. 


To start I had the students use a pre-marked up copied square I created for them. Each square had every 1 inch marked and was 10 x 10. So they should of ended up with 100 squares. From there I pre-cut up little squares of colored paper and let the students go to town.


My only few requirements were that their lines were straight, they did not cut any pieces in half and used at least 50% of their space. Also demonstrate craftsmanship with lining up those squares inside the space.  Some even got to making two.


I would totally do this project again, it only took two days for my students to do it. I would do more discussion and planning time for what they make next time. And really demonstrate how to line up that ruler better for lines. My students with more fine motor control issues did have some trouble with lining it up.